Now that you have finished the SMOP setup, there are a few quick steps to perform before you can start using SMOP.
Perform the following configuration steps:
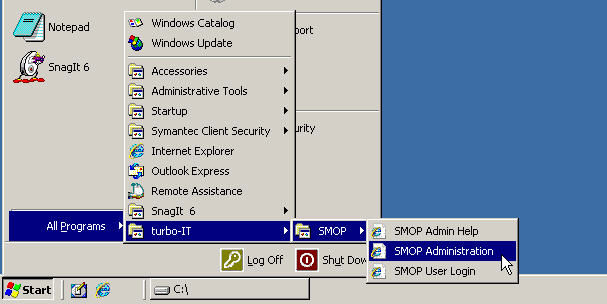
The SMOP Administration Page can be accessed at:
Start -> All Programs -> turbo-IT -> SMOP -> SMOP Administration
You should now see the following:

The first and most important item to configure is the SMOP Service Account - the account that will be used to reset passwords and enable accounts. For more information about this account, see SMOP Service Account.
Click on Options / Preferences, and then click on Active Directory. You may be prompted to log in with an account that is a part of the SMOP Administrators group that you specified during setup. After logging in, you will see the following:
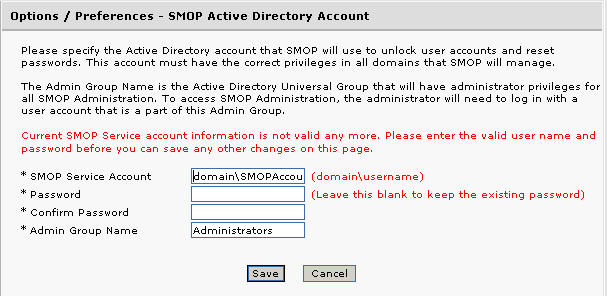
Enter the SMOP Service account in the form of "domain name\account name". Enter the password and confirm the password.
The SMOP Administrators group should also be displayed here. You should not need to make any chances to the Admin Group.
Click Save to save these settings. The settings take effect immediately.
Before using SMOP, you must specify AT LEAST one domain that SMOP will manage. This domain name will be shown to users in a drop down box when they are enrolling.
In the left hand pane of the SMOP Administrator, under Options / Preferences, click on Domains. You will see the following:
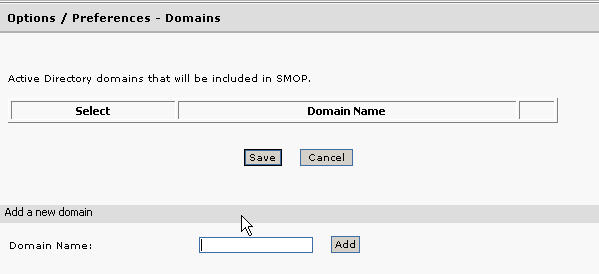
In the bottom area, enter a domain name and click on the Add button. The domain will show up in the top pane after you have added it.
The domain name can be a NETBIOS name or a fully qualified name (FQDN). See Domains for more information.
The settings will take effect immediately.
SMOP can send notifications to SMOP administrators to inform them about SMOP activity. Email settings and notification settings need to be configured for this feature to work.
In the left hand pane of the SMOP Administrator, click on Email Settings, and you will see the following:
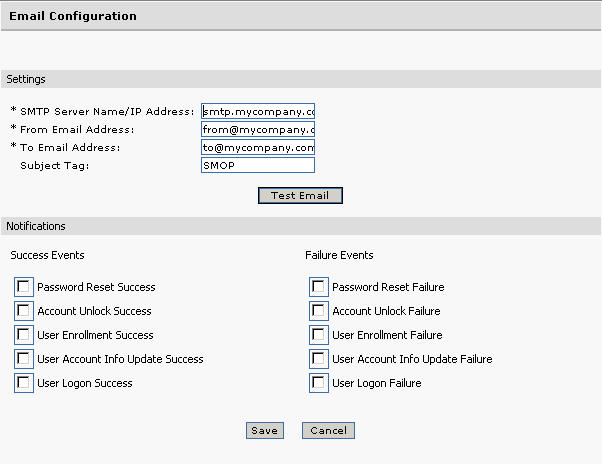
Configure the items in this area:
Server name
From email address
To email address
Subject tag
See Email Configuration for more details.
Click on the Test Email button and a test email will be sent based on your Email Settings. If this fails, troubleshoot the problem until the test email is working properly.
Failure of the email functionality will not prevent SMOP from working properly.
Configure for which events that you would like to see notifications.
See Email Configuration for more details.
A number of configurable SMOP options should be configured before using SMOP.
In the left hand pane of the SMOP Administrator, under Options / Preferences, click on Options, and you will see the following: TBD
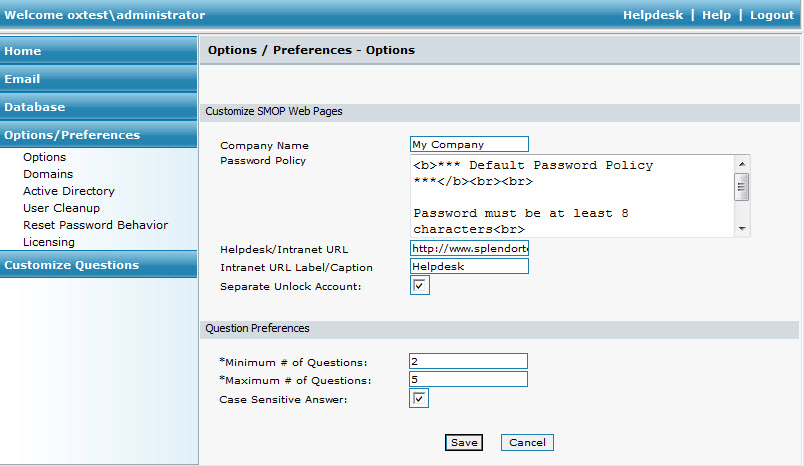
Configure the following:
Company Name
Password Policy Text
Helpdesk URL
URL Caption
Separate Unlock Account
Minimum Number of Questions
Maximum Number of Questions
Case Sensitivity
See Options for more information.
You may customize the questions that will get asked of users in this section.
In the left hand pane of the SMOP Administrator, click on Customize Questions, and you will see the following:
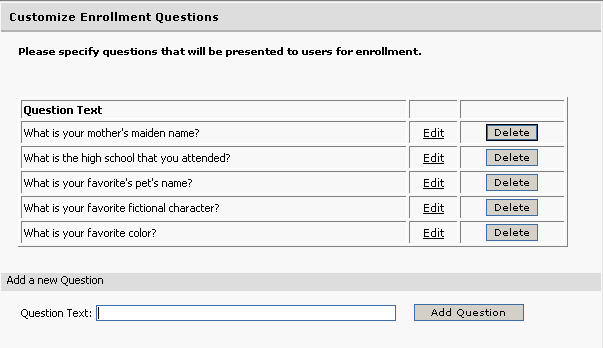
To add more questions, type in the question in the bottom pane, and click on "Add Question".
To modify an existing question, click on the Edit button and modify the question and click OK.
To delete a question, click on the Delete button.
For more information, see Customize Questions.
You are now ready to use SMOP to allow users to manage their own passwords.